Quieting Air Compressor: 10 Simple Noise Reduction Tips!
Air compressors can be loud and obnoxious fellas. Converting power into pressurized air is not a small task after all, so we have to tolerate some amount of noise.
But anything beyond 70 decibels is typically too loud to tolerate. If you believe that your air compressor is producing more sound than it should, it’s probably higher than 70 dB. You can get a rough estimate of how loud that is (if you don’t know already!) in this noise level chart.
How to measure air compressor noise level?
But to be really sure, you can use a decibel meter device, or a free decibel meter app on your smartphone. Simply turn on the device or app and place it near the air compressor when it’s working, and you’ll have an objective measurement of the noise.

Having these sound measurements is valuable for determining the effectiveness of any soundproofing or noise reduction project. So I encourage you to do this before quieting your air compressor. After you’re done with the project, you’ll be able to brag to your spouse/friends/governor about the noise reduction you’ve accomplished! And that’s all that matters.
I have a few excellent, cheap methods for quieting an air compressor that you can implement on your own. You can refer to this diagram to follow along in case you don’t understand something:
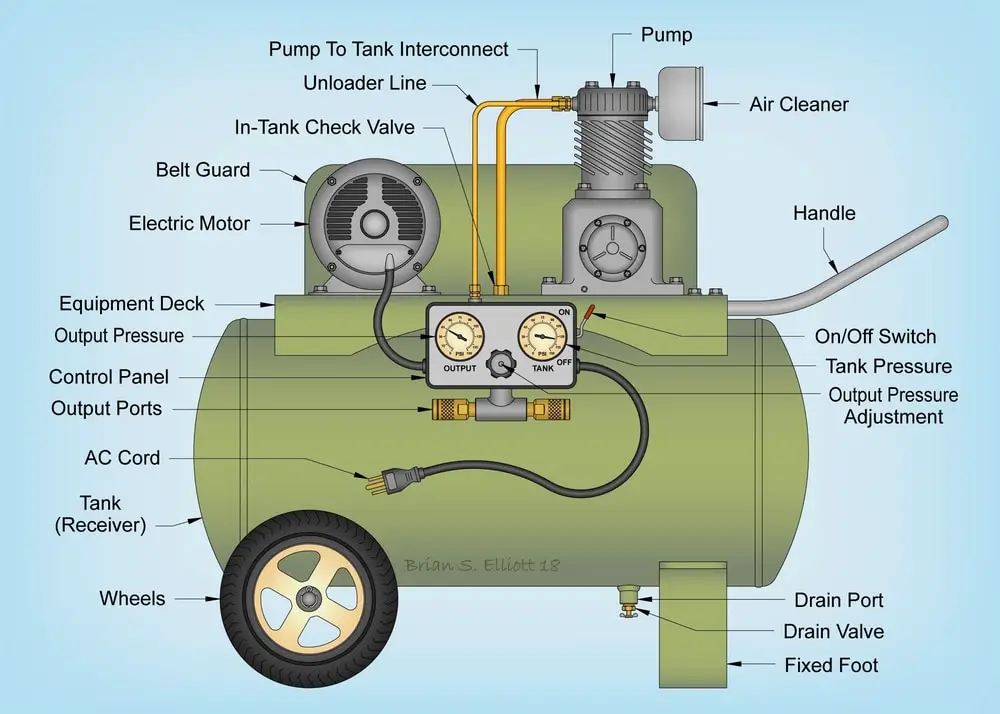
But before we start exploring these options, it’s valuable to know the potential sources of air compressor noise:
- THE FLOOR – Right off the bat, let’s blame the mother for everything. I meant the floor.. sorry Livia. Well, not everything, but it has it has to should some of the blame. When the air compressor vibrates, it vibrates against the surface it’s on. The vibration produces the so called “impact noise”. The vibrations reflect stronger on hard surfaces like hardwood or concrete floor. So the easiest thing to do in order to minimize this sound is to place the compressor on a soft and thick surface. This could be a thick rug or two, or a few layers of blankets. The best option is to use an anti-vibration rubber mat that is designed specifically for absorbing impact noise.
- THE STRUCTURE – Compressors that have a thin and lower quality structure will vibrate more. While the structure itself is not the primary reason for AC noise it’s something worth considering when buying a compressor in the first place. If it’s lightweight, it will probably vibrate more, unless other components are designed to be quieter than usual.
- THE SIZE – Larger air compressors can suck in more air and have a bigger exhaust. They also have a stronger and louder engine. All very good reasons why they’re louder than smaller ones. However, this is not a black-and-white situation. The amount of sound it makes is also determined by the structural design, quality of material and whether the air compressor was designed with the intention of being quiet or not.
- AIR INTAKE VALVE – The compressor makes most of the noise while it’s sucking in air through the filter. It’s the loudest component of the whole machine, and we’ll focus on silencing this part especially later on.
- AIR EXHAUST VALVE – This valve is a close second in terms of noise. It will also produce tons of noise and I’ll show you effective ways to silence it.
How to quiet an air compressor
I’ll jump straight to the motor, intake valve and exhaust valve silencing, since we covered the floor (pun intended) already.
1. Extend the intake component
Your air compressor is probably in an indoor area, such as a garage, basement or other part of the house. And the sound is annoying you in that area. But if you extend the intake component so that the intake of air happens somewhere else, it will make the compressor much quieter in the area where it’s located. For example if the air intake happens in the yard, it won’t disturb you in the garage, if that’s where your compressor is.
You can do this by using two simple items: a rubber hose and something to secure it to the intake valve, like a bracket or a rubber grommet. First attach the hose unto the intake valve and secure it tightly with one of these two items or a similar item. Next, extend the rubber hose and place the other end wherever you want the intake of air to happen. Presumably as far away from yourself and others as possible so that the noise doesn’t bother anyone.
Perhaps you’ll need to drill a hole through the wall to do this effectively. You can run the hose through a door, a window or some other open area. But in that case, the noise will still fall through the large, open space. So drilling a small hole through a wall or even a door to pull through the rubber hose can further reduce noise.
Here’s a DIY example:
The noise difference in this case doesn’t seem too impressive though. I guess it also depends on the length of the hose and the distance. Also, how well the hose is attached and tightened on the intake valve.
2. Install a muffler on the intake component
This is a fast and easy way to further reduce the noise from the intake. You can use two air hoses, attach one end to the valves and the other end to a regular car muffler. You’ll probably need some foam or similar soft material to cover the area in the muffler opening once you’ve placed the hoses inside.
So the muffler will break down the sound waves even further. That’s what it’s used for anyway. The video below demonstrates how this is done and the difference that it makes.
Some people commented that they can’t hear any difference in noise. I suggest using headphones if you’re not already, and you’ll hear a clear difference in noise with the hose+muffler method and without it. The guy who made the video states that this method produced a 4 dB decrease in sound. You can skip to 4:00 to hear the results.
3. Use rubber grommets on the compressor’s mount
Depending on the size and design of your compressor, it may have a small or a large mount that has to be attached to a surface. And often times it vibrates against the surface, producing extraordinary amounts of noise.
I previously mentioned the excellent sound insulation properties that rubber has. Rubber grommets in particular can be helpful in this case. You might be able to place the grommets in between the mount and the surface, so that they don’t touch directly. By having the rubber between them, it will absorb the vibration and alleviate the noise from that area completely.
This will not work with all compressors, but it might just work for yours. If you can do it, it would definitely be worth it. This video is an example of how it should look like:
If you’re going to do this method, I suggest getting a bunch of rubber grommets of different size. That way you can find the ones that fit the best on the spot. They’re pretty affordable and you’ll probably find them useful for projects as well.
4. Build a soundproof box for your air compressor
This is a bigger DIY project. But it’s a really effective way to deal with the sound. Most of the users on various forums and other websites recommend this as the best option. Soundproof boxes are frequently used for muffling generators. I actually wrote an article on how to make a soundproof generator box a while back.
The same principles from that article apply here as well. If you want to really reduce the air compressor noise, place it inside a thick wooden box. Plywood or MDF panels are most frequently used for making soundproof boxes. You can get either in custom size at stores like Home Depot.
You’ll need a circular saw, a drill and screws to make this box. First, measure the air compressor to make sure that the wooden box will be big enough to store the compressor inside. You’ll also want to make it big enough so that there is some space inside in order to prevent overheating.
Next, create a few holes in the wooden panels. These holes are necessary to prevent the air compressor from overheating. But don’t make them too big so that too much noise escapes through them. You’ll also need to drill some points in the box where the compressor extends beyond the box, if you’re using an air hose etc.
So once you’ve screwed or nailed the wooden panels together to build the box, you can finally cover it with soundproofing material to provide an extra layer of sound insulation.
Cover it from the inside or the outside (or both) with soundproofing material of your choice. I prefer Mass Loaded Vinyl because it’s great at absorbing impact noise. Also, it’s pretty affordable. In general, fiberglass and mass loaded vinyl are the best for impact noise. I would stay away from soundproofing foam as it only works for airborne noise and reducing echo.
To install the soundproofing material on the box, spray the wooden surface or one side of the material with a spray adhesive. Any spray adhesive will do. I use 3M General Purpose Spray for most of my projects. Then stick the material to the surface of the box.
Now you can place the air compressor inside the box or place the box over the air compressor, depending on how you designed it. The most important thing is that you’ve covered a lot of the open space through which sound can easily travel to the rest of the room. This is like having a small room with thick walls specifically for the air compressor.
However, don’t expect complete soundproofing results. In other words, don’t expect complete alleviation of noise. Since the box must have some holes for fresh air to come inside and hot air to come out, sound can also pass through those open gaps. But it will be far less than it used to be.
Most readers will find this method too difficult or time consuming. So here’s a simpler method that can also help:
5. Cover the air compressor motor with soundproofing material
If you don’t feel like building a wooden box and covering it with soundproofing material, don’t worry. You can cover the compressor’s motor directly with the soundproofing material instead. This will produce weaker results, but it will still make a noticeable difference. How can you do this exactly?
You can use impact noise absorbing material. Mass Loaded Vinyl is one material that I like. But for this project it’s easier to use one of the many anti-vibration mats that are used to soundproof vehicles.
FatMat is one that I’ve used (and recommended) in the past. It’s used for sound insulating car and boat engine compartments, car cabins etc. It’s a self-adhesive material, and can be easily cut to size. It can be installed on any surface, regardless of its shape.
Place one or two layers of FatMat or a similar product across the air compressor’s motor. By doing this, you’ll create an additional noise absorbing barrier. This method is especially useful on air compressors that have a thinner steel structure.
The so called “quiet air compressors” typically have some additional soundproofing material inside the motor compartment. Alongside a thicker metal enclosure of course. This can make them up to 30 dB quieter than their competitors on the market. This is a DIY method that follows the same principle, and for a much cheaper price.
However, the thickness of the metal structure plays a role here as well, so results will inevitably vary from one compressor to another.
6. Tighten any loose parts
Any loose parts on the air compressor, such as screws and bolts, can produce additional noise as the compressor vibrates. This is especially true for the screws on the mount.
Some other parts that can become loose after a period of time are the cooler, pulleys, flywheel, belt and clamps. Anyway, it’s best to inspect the entire air compressor and check for any loose parts and tighten them up accordingly.
7. Lubricate the bearings
There are many moving parts in the air compressor that require lubrication in order to function optimally and silently. The bearings in particular need to be lubricated every once in a while. However, you don’t want to grease up the bearings too much. The grease can clog up the bearings and make the motor run with more difficulty. There should be a happy medium of grease on the bearings.
8. Clean the air filters
You’re probably aware that air filters trap in dirt particles. That’s really their main purpose – they trap the dirt that would otherwise come inside through the air intake valve.
However, air filters are not self-cleansing. They have to be unclogged after a period of use. If they’re not unclogged, the dirt may start moving through the system, impeding the compressor’s performance. It will also block atmospheric air from passing into cylinders.
All of this can increase noise further. So unclogging the air filters is a must. Doing it once a year is usually enough for maintenance for regular use. If you use the air compressor frequently, unclogging more often (once every 6-8 months) is recommended.
9. Soundproof the wall
Is there a wall that you could soundproof to stop the noise? If there is, you can focus on that wall instead of quieting the compressor, or better yet, combine the two strategies. There are a number of ways to soundproof a wall:
- install a layer of regular drywall or soundproof drywall
- insert mineral wool batts between the wall joists
- screw mass loaded vinyl on the wall joists
- cover the wall with fiberglass panels
I prefer using mass loaded vinyl out of all those methods because it’s affordable and easiest to install. Alternatively, you can soundproof the ceiling or the floor above if the noise is annoying in the upstairs area.
If the walls are already pretty thick and well insulated, perhaps soundproofing the door or a window would be more helpful. This really depends on your particular situation.
10. Get a quiet air compressor
There is a huge difference in noise levels between air compressors. They can produce anywhere between 50 dB to 85 dB.
By getting a quiet air compressor you won’t have the need to do any of the projects mentioned above. It can turn out more affordable and less time and energy consuming to simply buy a quieter air compressor. Especially if your current one is getting old.
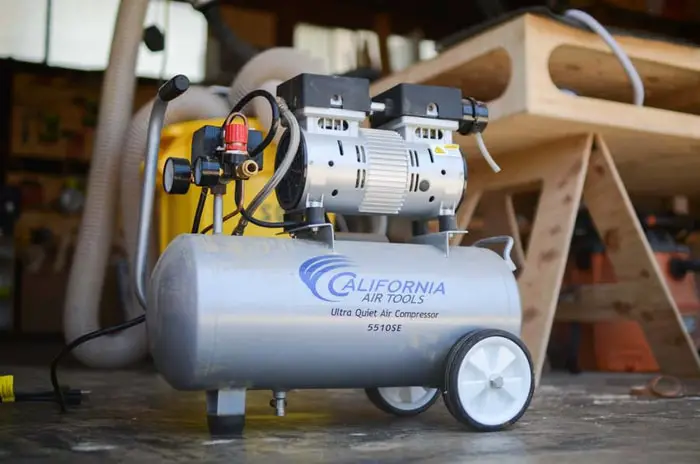
The most popular quiet air compressor at the moment is the California Quiet & Portable Air Compressor, shown on the photo:
Some excellent features it has are:
- Ultra quiet, producing only 56 decibels of noise
- oil-free single-piston pump with a life cycle of 3000+ hours (250 hours is average for most pumps)
- oil-free pump allows use in different temperatures and uneven terrains
- lightweight and easy to transport (29.5 lbs)
- 1.0 gallon steel tank
If you’re looking for something bigger and with more power, but also quiet, check out the California Ultra Quiet Steel Tank Compressor. This compressor is a bit louder, but it’s much stronger than the first option.
Features include:
- only 60 decibels of noise
- oil free pump
- 3.10 CFM at 40 PSI & 2.20 CFM at 90 PSI
- 120 PSI maximum pressure
- Thermal overload protector
- 5.5 gallon steel tank
There are many other quiet AC units to choose from. But these two combine affordable price and satisfying features. Not to mention 200+ and 600+ positive customer reviews which make them much safer than other, less popular options.
When AC noise spells trouble…
A loud compressor is a common occurence. But if it starts to produce unusual sounds, there might be a problem. Here are some common problematic sounds to watch out for:
A rattling sound will typically occur if there are loose screws on the mount.
A hissing sound can be a sign of excessive pressure, and you should immediately call a professional servicer to take a look. It doesn’t have to be dangerous but it could. A more harmless reason for hissing/bubbling noise could a refrigerant leak. If that’s the case, the AC will use more energy to function and will eventually stop working if the problem is not fixed.
Clicking noise usually indicates a problem with the relays or controls that are failing to initiate some part of the system and are left clicking in vain. This also requires calling a servicer to fix the issue.
Humming indicates that the AC is low on oil. It can also point to a bad starting capacitor. And if the humming noise is present, but the compressor won’t start at all, then the motor has probably said its final farewell.
Most of these problems can be outright prevented by regular maintenance of the air compressor:
Final Thoughts
Quieting air compressors is not too difficult. I’ve layed out the process in this article, and I’m sure you’ll find one or more methods that you can use. If you find the methods too complicated or time consuming, purchasing a new quiet air compressor is always an option as well. With that being said, I hope this article has been helpful to you, and feel free to check other content on the website.