How to Soundproof a Room for Podcasting on a Tight Budget
You might have a great podcast, but taking your sound quality to the next level can make it even better.
I’m sure that Joe Rogan or Sam Harris would have a much smaller audience if their podcasts were a mish-mash of chatter and traffic noise.
To increase the quality of your podcasts, the first thing you should do is improve the overall sound. There are two steps you need to cover in order to do this:
1. Soundproof the podcasting room
2. Improve the acoustics in the room
Aren’t these two the same thing? Well, they are related, but there is a difference.
Soundproofing a room for podcasts means isolating the room from outside noise and preventing the sound from the room to go out.
You don’t want your audience to hear little Jimmy shooting the hoops or uncle Robert flushing the toilet while you’re talking. Isolating the room from these interferences will improve the quality of your audio.
On the other hand, improving the acoustics in the room is about achieving better quality by reducing the echo in the room.
In this article I’ll share with you a few great ways you can do both.
Soundproof the podcasting room
1. Use a directional microphone
Regardless of the recording quality in the room, you should use a directional microphone to record your voice. Directional mics are those that capture sound coming from one direction. Most regular microphones, like the ones on laptops and cameras, capture the sound coming from all directions.
By using a directional microphone you will DRASTICALLY decrease surrounding noise on your podcasts. You may find that this is the only thing you need to do.
There are many solid directional mics to choose from. I’m not an expert on microphones, but these 3 are often recommended by podcasters, and you can check them out on Amazon:
For Beginners – Samson Q2U
High Quality – Blue Yeti
High Quality – Rode Procaster
2. Cover the cracks and gaps in doors and windows
A very common source of noise is the door, and more precisely the gap between the door and the floor. You might think this is insignificant, but you’d be dead wrong.
Any gap is a potential gateway for noise, regardless of how small it is. Front doors usually don’t have this gap, but inside doors do. The easiest way to get this fixed is to use a soundproof door sweep. Simply attach it to the bottom part of the door and it will cover the gap. It’s really affordable and makes a big difference.
Some gaps can be found between the door and the door frame. Like when you close the door, but there are a few millimeter gaps still surrounding the door. That’s what I’m talking about. To seal these gaps. add some thickness to the door frame where it meets the door.
Easiest way to do it is by taping over these gaps with weatherstripping tape. One layer is usually enough. Close the door to see if there’s a seal. If there isn’t, apply one more layer until you get there.
These gaps can also be found between the window and the window frame, and you can use the same method to seal them.
3. Thicken the walls and door
As I mentioned previously, you could reconstruct the walls entirely. It’s the best way to soundproof a room, but it’s really expensive. Instead of doing that, many podcasters thicken the walls by covering them with soundproofing foam panels. Here’s an example of that:
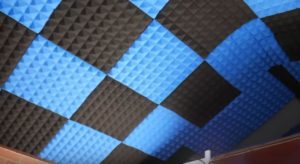
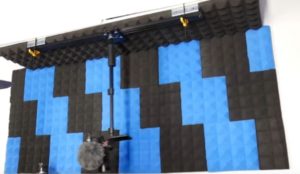
Soundproof panels make the walls thicker, reducing the outside noise, plus they reduce echo within the room and by doing so improve the acoustics.
I won’t get into details about panels here, but you can find my full panel recommendations and installation guide in this article. Be sure to check it out before buying to get the full details.
Another option is to cover the walls with thick moving blankets. Moving blankets are pretty affordable and can block a lot of the noise and prevent sound from bouncing off the walls just like panels.
But if you really want to SOUNDPROOF a room, you’ll need to do a bit more than that. It requires opening the wall to reveal the studs. Then installing a heavy and flexible material on the studs to increase the noise barrier of the whole wall structure.
The most popular material for doing this is Mass Loaded Vinyl, and this is a good way to apply it:
https://www.youtube.com/watch?v=wOWwY4QMsM8&t=2s
This is one of the best wall soundproofing methods, and it can be done even if you don’t have any experience. All you need are some screws or nails to install the MLV on the studs and you’re good to go.
The real work is opening the wall to reach the studs and then closing it. So if you opt for doing this, you’ll probably need some professional assistance.
For most podcasters, using foam panels or blankets is good enough to get the desired effect. Especially if the weak points of the room like doors and windows are also dealt with.
All of these methods are applicable if you need to soundproof the ceiling as well. It’s the same deal, it’s just a bit harder to get the material up there because you’ll have do the work from a ladder or standing on a chair. Unless you’re really tall or have a really low ceiling.
You can use any of these materials to soundproof the door as well. The installation is also very similar. Check out this door soundproofing guide for more information.
4. Cover the windows with noise-reducing curtains
Windows are another part of the room that needs to addressed. They’re thinner and made of lighter material than walls, which is why a lot of sound can easily pass through them.
To soundproof windows you could just drywall them. But in order to keep them functional and reduce noise, it’s best to use noise-reducing curtains. In this article I’ve reviewed the best ones and also shared a simple way to DOUBLE their effectiveness.
5. Soundproof the floor
Similar to soundproofing walls, you can use two approaches with the floor. One involves opening the floor and installing a floor underlay (subfloor) to really add mass and thickness to it. The other options involves only covering the surface of the floor with thick carpeting or rubber floor mats.
In the first case, the subfloor is placed on the studs, and it’s usually made from thick plywood or MDF panels. Sometimes a soundproofing sealant like green glue is used to further reduce impact noise. Then the surface layer of the floor is placed on top and you’re done. The finishing touch would be a thick carpet, in order to reduce echo and foot traffic noise.
To learn more on how to do this (video tutorials included) check out this floor soundproofing guide.
Improve The Acoustics
I already explained the importance of directional microphones. This is definitely the first item you should invest in, and potentially the only one you’ll need to raise the sound quality of your podcasts.
Well, if you find that even with a directional microphone you’re still not happy with the sound quality, you don’t have to immediately soundproof the entire room. Instead, you can create a soundproof box for your microphone.
This video explains how you can create a soundproof box with two items – a large bin and a mattress pad:
There are also professional soundproof mic boxes available.
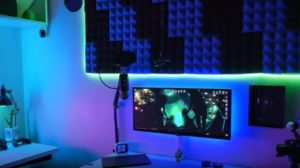
Other than that, improving acoustics is really all about reducing the echo in the room. The easiest way to do this is to place soundproof foam panels on the walls.
The foam doesn’t allow the sound to bounce off the walls as it usually does. If you decide to do that, additionally placing a thick rug on the floor will also make a difference.
Conclusion
There are many ways to improve your podcasts and recordings in general. Soundproofing the entire room is the best way to go about it, but how much soundproofing is needed is different for every content creator. Getting a solid directional microphone is by far the most important factor.
The other steps may depend on how much noise problems you’re dealing with, how perfect you want your acoustics to be, and the budget at your disposal.
So if you were wondering how to soundproof a room for podcasts, now you know the best affordable options. I hope you find them helpful and I wish you good luck with this project and your podcasting endeavours.