How to Soundproof a Closet Cheap: 10 Essential Tips
Want to sing the opera without disturbing your neighbors and frightening your cat? Well.. do you have a walk-in closet in your home?
If the answer is yes, you’re on the right path. Because by soundproofing it you can sing or do whatever you want inside without anyone knowing about it.
There are many soundproofing materials you can use to get the job done. In this article I’ll focus on effective ones that are also affordable.
1. Declutter and remove the racks
Before you can even begin to soundproof a closet, you must make room for the material.
Remove any stuff that would prevent you from placing the material on the walls. Including clothes, boxes and any racks that might be installed in there.
If you can’t remove a rack or two for some reason, that’s fine. Because soundproofing material can be cut to size by using a knife or scissors and placed around the racks or other obstacles.
2. Consider the power outlets
If you plan on using any electronic equipment, make sure that the closet has a power outlet available.
If not, either get one constructed by a professional electrician or use an extension cord.
If you plan on using an extension cord, you’ll have to drill a small hole in the closet door for the cord to move through. Because if you leave the door open, then the soundproofing won’t be very effective.
3. Soundproof the closet with Mass Loaded Vinyl
This is my favorite soundproofing material because it’s REALLY powerful at blocking sound.
Since a closet is typically not very thick, you need to use heavy and thick material in order to soundproof it. And MLV is one of those rare, heavy materials that can be installed on any surface in order to soundproof it.
Here’s a fun experiment made with a few layers of MLV wrapped around a cylinder. From 100 to 54 decibels! Check it out:
In order to install it, first cut it to the required size with a knife. Next, use either a spray adhesive, nails or screws to make it stick to the surface.
A fair warning though: it typically takes about 3-4 days for the industrial smell to go away. So I suggest opening the box and leaving it in the open for a few days before installing.
It’s not a terrible smell by any means, but I don’t know how sensitive you are in this regard so it’s better to be on the safe side.
So make sure that you’ve covered the closet from all sides with the vinyl for the best result. You might also want to cover any gaps between the vinyl sheets with soundproofing tape.
Mass loaded vinyl is all you’ll need to really soundproof the closet walls. Plus, it will also drastically reduce the echo because it absorbs both high and low frequency sound waves.
It’s the best material and the best method, and that’s why I’m placing it in the number one spot. But if for some reason you don’t want to use MLV, keep reading to learn about the other options.
4. Soundproof the closet with thick moving blankets
Moving blankets are very popular for soundproofing projects. They won’t block the sound completely, but they’ll muffle it substantially. And that’s even more true if you use very thick and heavy moving blankets.
The heaviest moving blanket available on the market is the Supreme Mover.
If you plan on using this method, use either that one or one that is similar in weight. Or you can use lighter blankets, but make sure to use more than one layer to get similar results.
So how do you actually soundproof a closet with moving blankets?
It’s pretty similar to installing MLV. Nail, screw or tack them unto the closet walls. You may have to cut the blanket to size before installing it. Use a pair of sharp scissors to do it.
This will probably cost around $100, if you decide to cover the closet from all sides. But it also depends on the size of your closet, because it will also determine how many blankets you’ll have to use.
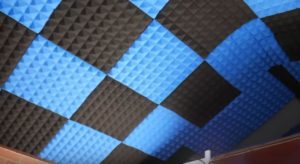
5. Cover the walls with acoustic foam panels
Acoustic foam panels are the most popular item for turning a closet into a vocal booth. I can completely agree with that, because these panels are excellent for reducing echo. Plus, they’re pretty affordable.
However, they are not the best material for soundproofing. Foam panels are fairly light and not dense enough as MLV, mineral wool batts or drywall. They simply lack the mass that is required to block significant amounts of sound.
So I highly encourage them for reducing echo, either by placing them directly on the wall or even on top of MLV. Here’s an example of properly installed foam panels in a home recording studio:
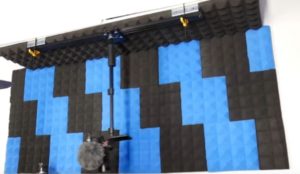
If you’re not concerned about the noise in any way, and simply want better acoustics, then definitely use foam panels. Installing them is simple with hanging strips or a regular spray adhesive.
6. Cover the closet floor with a soft mat or a carpet
Hard floors are responsible for a lot of echo and bad acoustics.
But also, if you’re worried about the sound travelling through the floor, it’s worth adding some soft and thick material on top for that reason too.
So my advice is to place a thick rug or carpeting on the closet floor. An even better alternative are thick and soft floor tiles.
Cover the entire floor or as much of it as you can. This way you’ll prevent sound from bouncing off on the floor and you’ll equip it with a decent noise barrier as well.
7. Hang a noise blocking curtain or moving blanket in front of the closet door
If you have a small closet this can be really helpful because you can do this from the outside as well.
Simply attach a curtain rod to the wall above the closet door. Then hang a heavy and thick curtain or a blanket from the curtain rod.
A good thing about noise-blocking curtains is first of all that they’re very affordable (in the $15-60 price range) and that they’re very effective. There are also many dimensions (as well as colors) to choose from.
So they can be a very practical solution for sliding closet doors, since there are many wide curtains for insulating sliding doors.
Also check out my one simple tip to double their effectiveness.
8. Seal any gaps and cracks in the closet door with foam tape
I’m not sure what type of a door your closet has. But if you notice there are any gaps, large or small, be sure to cover them with foam tape. These gaps can act as weak points that allow sound to pass through.
Foam tape is very cheap and there are different dimensions to choose from. It’s also self-adhesive, and it can be easily cut to the required size with a knife, scissors or with bare hands if the foam is relatively thin.
I’ve used foam tape on all the door frames in my home for better sound and thermal insulation. It’s a 5 minute process that makes a big difference for both.
I also suggest using it around power outlets if there are some gaps left after you’ve installed the main material around them.
9. Hang bass traps on the corners
Bass traps are a very cheap but effective product for reducing echo. They have a pyramidal design that absorbs more sound waves than regular acoustic panels.
You can use both to get better results. Because bass traps are typically placed only on some locations, while you can cover as much of the walls as you want with acoustic panels. But it’s not really necessary unless you’re making a really professional booth inside your closet.
You’re looking for a cheap solution, and bass traps provide great echo reduction for very little money or installation effort.
Hang them on different spots across the wall with hanging strips. Be creative. Most people hang them on the high corners of the walls and sporadically across the surface.
10. Alternative: A portable, ready to go vocal booth
This is the most expensive option by far. But I’m just putting it out there for people who would prefer a portable vocal booth or one that can be set up anywhere.
This vocal booth uses heavy blankets and bass traps for echo-free acoustics. The material also muffles the sound. But don’t expect complete soundproof quality, because it doesn’t have enough mass for that.
The booth is very easy and quick to assemble and no tools are required. And it’s small enough to fit into a car when not assembled. So it’s a very practical choice for those who travel a lot and want to practice in any situation.
The main disadvantage is the size. It’s a small, 3 x 3 walk-in booth. Only one person can use it at a time. So if you plan on using some large musical equipment it’s definitely too small for doing that. But for only singing into a microphone it’s big enough.
Also, there’s no floor in this booth. So if you place it on a hard floor, I still recommend placing a rug on the floor to further reduce the echo.
Overall this is a great practice booth for those who have the money, but lack the time or energy for soundproofing a room or a closet.
Final Word: Soundproof Walk-In Closet
There are many ways to soundproof a closet. But I wanted to share with you the best cheap ideas.
You could cover the entire closet with acoustic foam panels which is what most people do. Acoustic foam panels are awesome for echo reduction, but they won’t actually soundproof the closet. They lack the mass and density that soundproofing requires.
MLV is much better at blocking sound so it remains the number one choice. The other options are there as supplementary tips to improve the acoustics and soundproofing even more. Hope this helps!