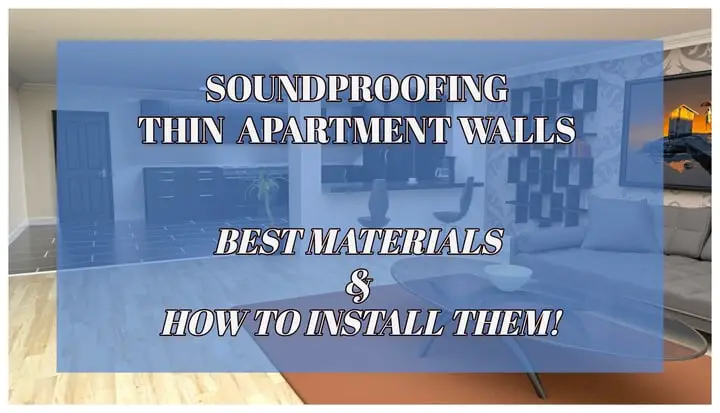
Soundproof Gaming Room: 7 Easy Steps to Success
Soundproofing a gaming room is very similar to soundproofing any other room. Unless you’re playing your console or PC games in a spaceship, your gaming room has a door, ceiling, floor, regular walls and possibly a window and an air vent as well.
So each of these areas of the room will have to be soundproofed to a degree if you want to play full blast without annoying your neighbors or housemates.
So here are the best methods you can use for each of these areas. For these projects, you can find recommended products that are available on Amazon, that I’ve had success with in the past. And some that are simply the standard in the soundproofing industry. I’ve also taken the price into consideration and found the most affordable options that still provide quality insulation. So I hope you find this helpful:
1. Soundproof the door
Your gaming room must have a door, right? And you’re aware that your door is thinner than the walls. There are also small gaps between the door and its frame. There is also a few millimeter gap under the door. We need to take care of these, because a thin barrier and open spaces surrounding it are the weakest points in the room in terms of sound transmission.
How to cover the gaps
First take care of the gaps by covering the door frame with weatherstripping tape. Usually one or two layers are required. The main objective is to have a seal between the door and the frame when its closed so close the door and see if there’s more tape required until you get there.
The second gap is the one under the door. Maybe your door doesn’t have this gap, but most interior doors do. If there is a gap, cover it with a door sweep. I recommend using silicone door sweep. Why? Because it’s self adhesive and installation is very simple. First cut it with a knife to match the width of your door in case it’s too long. Then simply attach it to the lower part of the door and you’re done. Now no sound or bugs can pass through.
After you’ve taken care of these gaps, it’s time to focus on the door itself. We have to add mass to the door, otherwise the noise will not only pass through, but also resonate and create more noise if there are any vibrations from bass and low frequency sounds going on.
How to add mass to the door
The easiest and cheapest way is to hang a thick moving blanket on the door. I didn’t like moving blankets at first, but that’s because I was using thin blankets.
You have to use a HEAVY moving blanket for proper sound insulation. You can hang it by nailing/screwing/tacking it on the door. A moving blanket will not only add mass to the door and act as a sound barrier. It will also dampen the noise in the room and reduce echo since it will cover a large, otherwise hard surface that resonates sound.
An alternative to a moving blanket are (really) thick soundproofing acoustic panels. To install these panels, you can use hanging strips (like Command Strips), screw/nail them to the door or use a general spray adhesive to glue them to the door.
Hanging strips are the cleanest option because it’s easier to remove the panels and move them around later. If you glue them to the door with an adhesive it will leave a mark on the door and possibly ruin the panel if you try to remove it later. So hanging strips are my number one recommendation. But if you plan on soundproofing the door permanently, it really doesn’t matter which installation method you use.
Another alternative is to cover the door with Mass Loaded Vinyl. This product is typically placed inside the wall (by screwing it on the studs). It’s also used to soundproof vehicles because it can withstand high temperatures and is excellent at blocking vibrations.
It provides excellent insulation against airborne and impact noise, just like fiberglass. The installation process is the same. Cut it to size with a knife if needed, and then screw/nail/glue it to the door.
It doesn’t look very nice though. Basically it’s like a black surface and it can get depressing. But you can paint it to any color you like with latex paint. Or you can cover it with any fabric so it’s all good.
2. Insulate the gaming room walls
To really block ALL the noise from coming in and out, you’ll probably need to add some thick and heavy material inside the walls. The best way to do it is by installing mineral wool batts (Rockwool) or Mass Loaded Vinyl inside the wall.
But there are some sound deadening methods that don’t require opening the wall. I’ll cover each of them now and you can decide for yourself which one you prefer.
Insulating the wall from the inside
Mass Loaded Vinyl can be installed directly on the studs by screwing or nailing it to them.
Mineral wool batts are placed between the studs so that they cover the empty space between them in order to block the noise that would typically pass through those hollow areas.
When working with mineral wool, always wear gloves, long sleeves, glasses and a mask because these batts can emit small mineral wool particles which can be irritating to the skin. This is why they’re placed inside the wall instead of on the surface.
Another option is to install a layer of standard drywall or soundproof drywall. This is pretty effective, but you’ll probably need to hire a professional to do it for you. Which can increase the price substantially. Plus, it will take away space from the room. So if your room is small to begin with, it’s not the best idea available.
Since installing MLV or mineral wool batts is simple and straightforward you can do it by yourself and cut down on the labor costs. But it requires opening up the wall in order to reach the studs. So it’s best to do this if you’re already in the process of reconstruction. If not, maybe you’ll prefer the following methods instead.
Place soundproofing material on the wall’s surface
Right off the bat, let me mention that this is less effective than insulating the inside of the wall. If you’re dealing with vibrations from bass for example, it’s better to insulate the studs because they are at the center of the construction.
However, adding soundproofing material to the surface of the wall can be effective for blocking regular noise, and it’s far easier to do. It can also be less expensive, depending on the products you use. I’ll mention a few affordable options that you can order online.
The first option are thick moving blankets. They can be used to muffle the noise from walls, doors, windows and ceiling. I recommend using these thick blankets by nailing or screwing them on the wall. Also, the more layers you place the better insulation these blankets will provide, simply due to additional thickness and mass.
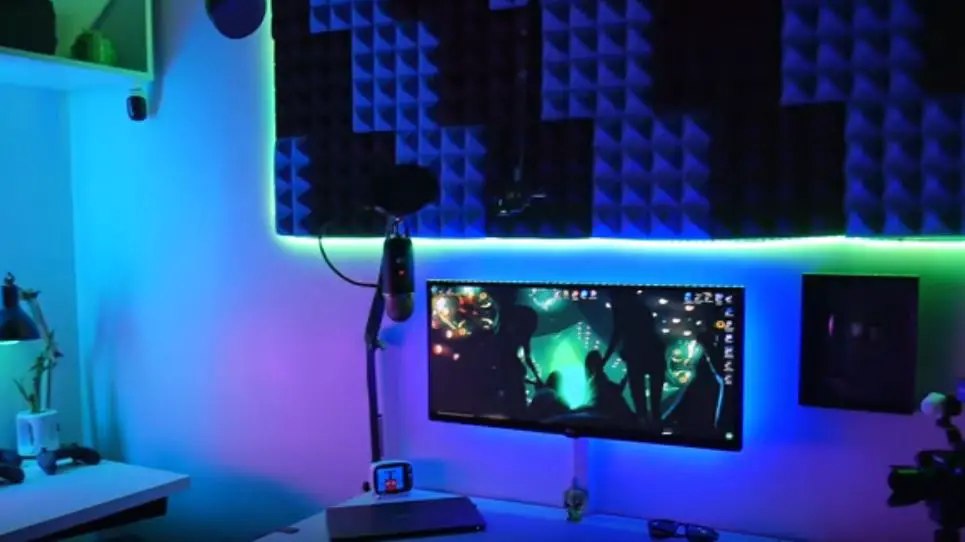
The second option is to cover the walls and the ceiling with soundproofing foam panels. I know what you’re thinking: foam panels don’t soundproof the noise, they only reduce echo. Well, that’s sort of correct.
Foam panels will muffle the noise to an extent, but they won’t completely block it. However, doesn’t echo reduction also lower the perceived noise? By reducing the echo in the gaming room, you will reduce the scope of the noise and the subjective feeling of its volume.
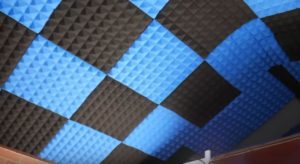
The second obvious benefit is the improved quality of sound. If you record videos or podcasts, this definitely comes in handy. Check out this gaming room ceiling covered with foam panels:
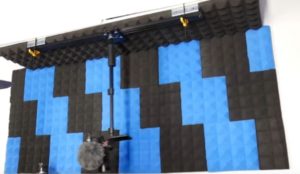
..and in front of a mic stand:
The more of the area you’re able to cover with foam panels the better echo reduction and noise muffling you’ll get. I recommend installing foam panels on the wall with cheap hanging strips.
These panels are not too heavy, so attaching one or two hanging strips on the back will keep them on the wall permanently. These black and blue foam panels are pretty affordable and you can cover 12 square feet for less than $20. They’re currently available in 7 different colors.
An alternative to these foam panels are thick acoustic panels.
What about Mass Loaded Vinyl? Can MLV be installed directly on the wall? Yes, it certainly can, and it can do a great job at blocking noise. The reason I’m mentioning it as one of the last options is because having a large black wall doesn’t look too nice.
But if you can find a large fabric to cover it with or if you can place some large furniture by the wall, it can be a great, fairly affordable solution. And it has a higher NRC rating than all of these other materials.
You can also build a soundproof booth using moving blankets, PVC pipes and a few other items. Soundproof booths are often used by musicians, typically singers. But there’s no reason why you couldn’t make one for gaming and save on the costs of soundproofing an entire room.
3. Hang noise-blocking drapes on the window
Just like the door, window can be another weak point in terms of noise. Some methods you can use to soundproof a window include installing an additional window pane, making a window plug, and covering the window with noise blocking drapes.
I recommend using the last option for most people. Thick drapes do very well in terms of reducing echo and reducing noise passing through the window. They also provide decent thermal insulation. You should get long and large drapes that can cover a larger area. They should cover the window and a small area around the window as well.
To hang these drapes, you’ll need a simple curtain rod installed above the window. I also suggest using weatherstripping tape on the window frame to seal off any gaps between the frame and the window. These gaps not only allow sound but also cold and hot air to pass through easily.
So these are the two main tips that I recommend and they’ll probably be enough for good results. For more extreme window soundproofing tips, check out this article.
4. Insulate the floor with floor underlay and thick carpeting
Should you soundproof the floor in your gaming room? That depends on whether anyone lives downstairs and is disturbed by the noise. Or perhaps they’re making too much noise and ruining your gaming experience? Either way, in that case you’ll want to add mass to the floor.
The simplest way to do this is by installing a subfloor (floor underlay). This is typically done by placing an additional plywood or MDF wood panel surface on the floor. Sometimes green glue (a powerful soundproofing sealant) is used between the subfloor and the floor’s surface to further reduce any impact noise.
If you’re not dealing with severe noise, this may seem like too much work. And you’re probably right. If the noise is not severe, covering the floor with a thick carpet or rugs can also work.
My favorite method however is to cover the floor with closed-cell foam mats. These are often found in weightlifting areas in the gym. They protect the floor, reduce noise, and make the floor warm and comfortable to walk on at all times. I also like these mats because they’re soft enough to sit on while playing games, meditate, read, write or do a workout. Plus they’re non-skid and liquid resistant.
If you spill any Mountain Dew on these bad boys you don’t have to worry about leaving a mess, which is exactly what would happen if you spilled any on a carpet.
Extra tips:
5. Build a soundproof box for your computer housing
You can reduce the noise coming from your computer case by placing it in a soundproof box.
Building this box is fairly simple. You’ll need a few plywood panels, some nails and/or screws to piece them together, some mass loaded vinyl and some acoustic foam would also be great but it’s optional.
So once you’ve built a box that is big enough to place the computer case inside, cover the inside of the walls with mass loaded vinyl. Then optionally glue acoustic foam to the vinyl or leave it as it is. Then place the computer case (housing) inside.
You’ll of course have to leave one side of the box open or make a few holes in the plywood so that your computer doesn’t overheat. But there will still be less room for the noise to come out so it will reduce it to an extent.
To learn more about making a soundproof box read this article.
6. Reduce noise from your console’s fan
Consoles can also get pretty loud, even the newest Playstation and Xbox. This typically occurs due to high graphic demands which leads to overheating. The overheating is then battled by increased fan speed.
Tackling the overheating aspect can reduce the noise by a large margin. Check out how to silence PS4 and similar consoles in this article.
7. Use a noise-blocking gaming headset
The simplest and easiest way to solve the noise problem is to use a comfortable and effective gaming headset. There are many gaming headsets available, but some are better than others.
There is also the question of price, with the prices ranging anywhere between $40 and $500. I researched a number of gaming headsets and narrowed the best ones in different price ranges for your convenience:
My #1 Recommendation
Adasto Gaming Wireless Headset is arguably the best of all time. Perfect crisp surround sound, precise microphone and as the name says it’s wireless.
This headset is used by many pro gamers, especially in cooperative games like Call of Duty and LoL. If you’re willing to invest a bit more money for awesome sound quality, this is the way to go.
Best Under $100 Gaming Headset for Xbox
Not willing to pay more than $100 for a headset. No worries! Turtle Beach Stealth 700 is another great gaming headset.
It’s features include wireless connection, surround sound and ACTIVE noise cancellation. What active noise cancellation means is that the headset is extra geared towards blocking outside noise by design.
Another cool thing about this headset is the Xbox wireless direct option. If you have an Xbox you can just turn it on and start playing without any base station or adapter.
Best Under $100 Gaming Headset for All Gaming Platforms
SteelSeries Arctis 3 Gaming Headset is an affordable alternative to both Turtle Beach and Adasto headset. Arctis has won mutliple awards for design and effectiveness, and this is one of their best products.
This gaming headset is compatible with PC, PlayStation 4, Xbox One, Nintendo Switch, VR, Android and iOS. It’s the all-in-one package for those people who own multiple gaming platforms and for those of us who just like to stick with one.
Great ClearCast mic, 51 sound drivers, and cushioned headband make this headset a joy to have. At around $70, this headset is the best affordable option for gamers who are interested in lowering noise without jeopardizing their gaming experience.
Final Thoughts
As you had the chance to discover, there are many ways to soundproof a gaming room. Some are more effective and more costly than others. Some require more work, and others are a breeze and can get accomplished in one hour or less.
The easiest option is to use an effective headset. But if you want to upgrade your gaming room and turn it into a bastion of freedom, then you should use some of the soundproofing tactics shared in this article. Moving blankets and foam panels are cheap and effective at muffling noise and improving acoustics. Mass Loaded Vinyl is a great and affordable product and fairly easy to install as well.
I suggest going with these options if you’re new to soundproofing. And also, focus on the weak points, namely the door and window first. Covering those gaps in the frame and adding mass to a thin door is crucial for preventing the free-flow of air and the noise that comes along. Hope this helps!